

Industry
Feb. 17. 2024
Nintendo Switch 2 Launch Delayed to 2025
Upcoming
Feb. 17. 2024
Xbox and Microsoft Flight Simulator Unveil Collaboration with Dune & More
Industry
Feb. 16. 2024
OpenAI Announces New AI Tool 'Sora'
Culture
Feb. 15. 2024
Black Myth: Wukong Dev Game Science Releases Chinese New Year Short Film
Upcoming
Feb. 15. 2024
Moon Studios Unveils 'No Rest for the Wicked'
Upcoming
Feb. 15. 2024
Psychedelic Metroidvania 'ULTROS' Officially Comes to Steam
Culture
Feb. 15. 2024
Godzilla x Kong: The New Empire Reveals New Official Trailer


Insight

Nintendo Switch 2 Launch Delayed to 2025
Feb. 17. 2024
Insight

OpenAI Announces New AI Tool 'Sora'
Feb. 16. 2024
Insight

Nintendo Leads in Net Cash Among Companies in Japan
Feb. 8. 2024
Insight
Roblox Launches Real-Time Text Translation, Eyes Future Voice Translation with AI
Feb. 7. 2024
Insight

Xbox Will Address Console Exclusivity Strategy in Upcoming Business Update
Feb. 7. 2024
Trending

Black Myth: Wukong Dev Game Science Releases Chinese New Year Short Film
Feb. 15. 2024
Trending

Godzilla x Kong: The New Empire Reveals New Official Trailer
Feb. 15. 2024
Memeable
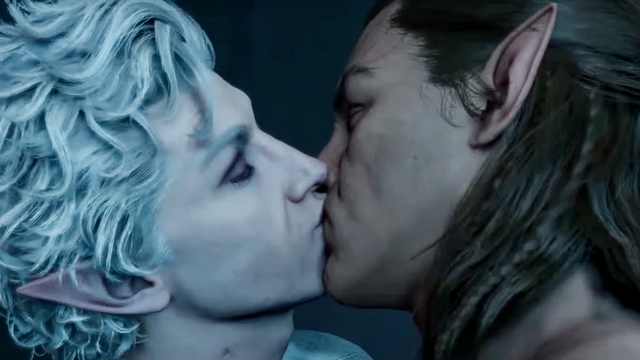
Baldur's Gate 3: Patch 6 Incoming, Bringing Better Kissing Scenes
Feb. 13. 2024
Trending

The Legend of Zelda Orchestra Concert
Feb. 11. 2024
Design Talks
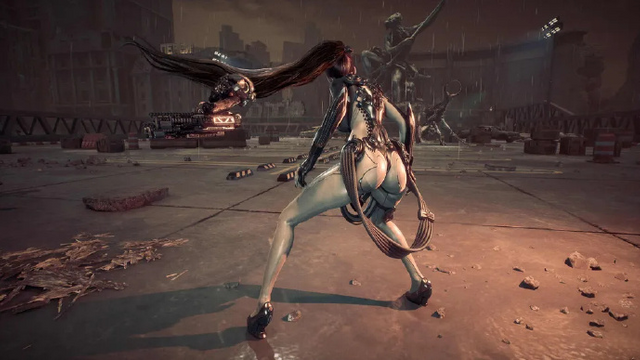
Stellar Blade Dev: We've Paid Special Attention to Protagonist's Back
Feb. 11. 2024
Culture
Baldur's Gate 3: Patch 6 Incoming, Bringing Better Kissing Scenes
Larian Studios, in a heroic quest to keep the love alive in "Baldur's Gate 3," has announced the imminent release of Patch 6, promising not just any old updates, but "improved smooches" for all your r
Feb. 13. 2024
Upcoming
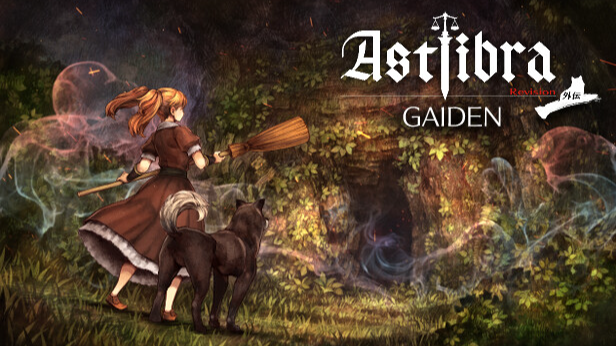
ASTLIBRA Revision Expands With New DLC 'ASTLIBRA Gaiden: The Cave of Phantom Mist' Coming to Steam
WhisperGames has officially announced the upcoming release of 'ASTLIBRA Revision' DLC, 'ASTLIBRA Gaiden: The Cave of Phantom Mist,' now listed on Steam with a planned launch in the first quarter of th
Feb. 13. 2024
Culture
The Legend of Zelda Orchestra Concert
Relax and enjoy a selection of iconic songs from across The Legend of Zelda series, including adventurous arrangements from The Legend of Zelda: Tears of the Kingdom, The Legend of Zelda: Ocarina of T
Feb. 11. 2024
Culture
Stellar Blade Dev: We've Paid Special Attention to Protagonist's Back
Stellar Blade - Screenshot
Stellar Blade developer Kim Hyung-tae stated that they paid special attention to the protagonist's back when developing the game.
Stellar Blade - Screenshot
Stellar Blade is
Feb. 11. 2024
Culture
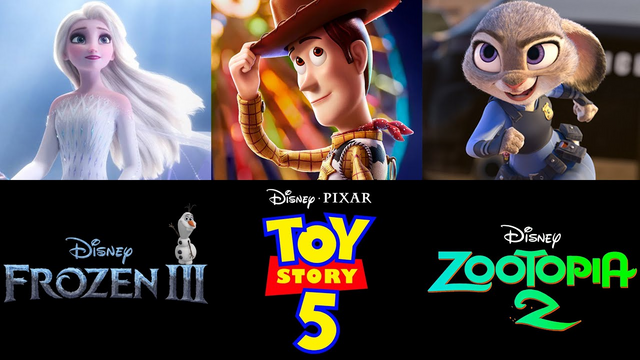
Disney Announces Exciting Sequels to Beloved Animated Franchises
Disney Announces Exciting Sequels to Beloved Animated Franchises
The Walt Disney Company is set to enchant audiences once again with new installments in some of its most beloved animated franchises, C
Feb. 11. 2024
Upcoming
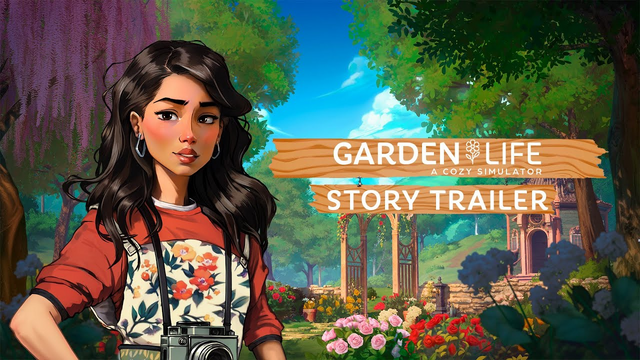
Garden Life Releases Story Trailer
Available for pre-order, Garden Life: A Cozy Simulator is now delighted to unveil its Story Trailer.
Take part in an immersive and cozy journey where you will have to bring back to life a communal ga
Feb. 11. 2024
Upcoming

Magical Delicacy Demo Now Available on Steam
A demo version of Magical Delicacy, a game where a budding witch aims to become the best cook in town, now supports Japanese and is available for download. Set in the town of Gratt, inhabited by disti
Feb. 9. 2024
Upcoming

New Indie Racing Game 'Tiny TIres' is Coming Soon
The indie game realm is welcoming a new racing game, Tiny Tires, to the community. The game is developed by a single indie developer, so gamers who are interested need to wait for a bit longer.
Check
Feb. 9. 2024
Culture

'Jellyfish Can't Swim in the Night' Releases Official PV
Anime series 'Jellyfish Can't Swim in the Night' has released its official PV. Check it out:
'Jellyfish Can't Swim in the Night' will premiere on April 6, 2024.
Source: YouTube
Feb. 9. 2024
Upcoming

Cozy Caravan Launches: A Heartwarming Adventure of Crafting and Exploration
Cozy Caravan, a charming single-player game, invites players on a top-down journey filled with crafting, trading, and exploration. Set in a beautifully cozy world, players will find themselves navigat
Feb. 9. 2024
Upcoming
CORALINE Remaster Coming to Theatres
Laika Studios is set to celebrate the 15th anniversary of the critically acclaimed stop-motion animated film Coraline by re-releasing it in theaters in a remastered 3D format this August 2024.
New po
Feb. 9. 2024